Posted 23:19 April 02, 2023
Last Updated 13:29 April 12, 2023
Here's a step-by-step guide on how to fix a leaky showerhead:
1. Gather the necessary tools and materials: To fix a leaky showerhead, you will need some basic tools and materials. You will need an adjustable wrench, pliers, Teflon tape, a rag or towel, and possibly a replacement showerhead or parts if needed.
2. Turn off the water supply: Before you start working on your showerhead, it's essential to turn off the water supply to avoid any potential flooding or accidents. Locate the water shut-off valve for your shower or bathroom, which is usually located near the shower or in the main water supply line for your home. Turn the valve clockwise to shut off the water supply.
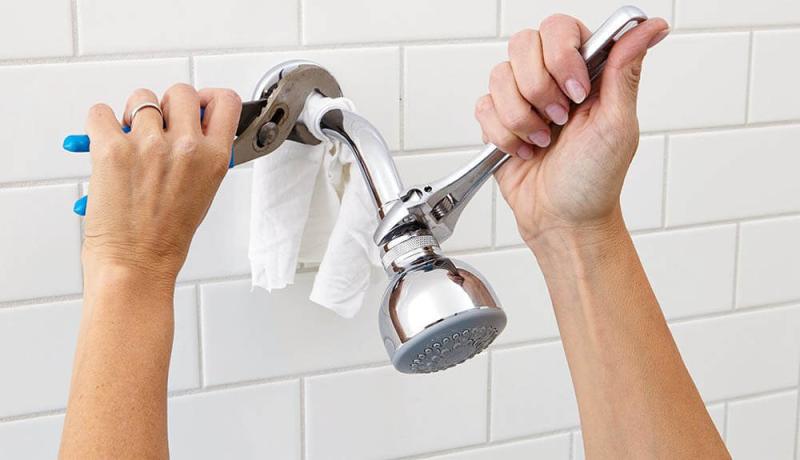
3. Protect the showerhead finish: To prevent scratching or damaging the finish of your showerhead, wrap a rag or towel around it and secure it with a rubber band or tape. This will protect the showerhead and keep it looking nice during the repair process.
4. Remove the showerhead: Use an adjustable wrench or pliers to loosen and remove the showerhead from the shower arm. Turn it counterclockwise to unscrew it. Be careful not to apply excessive force to avoid damaging the shower arm or the showerhead itself. If the showerhead is stuck, you can use a pipe wrench or a strap wrench to provide more leverage.
5. Inspect the showerhead for damage: Once the showerhead is removed, inspect it for any visible damage, such as cracks, clogs, or worn-out parts. If you notice any damaged components, you may need to replace them with new parts or replace the entire showerhead, depending on the severity of the damage.
6. Clean the showerhead: If the showerhead is not damaged but has mineral deposits or debris that could be causing the leak, you can clean it by soaking it in a solution of equal parts water and vinegar for about 30 minutes. Then use a soft brush, toothbrush, or a paperclip to remove any clogs or debris from the spray holes. Rinse the showerhead thoroughly with water to remove any remaining vinegar solution.
7. Apply Teflon tape: Teflon tape, also known as plumber's tape, is a thin, white tape used to create a watertight seal. Wrap Teflon tape clockwise around the threads of the shower arm, which is the pipe that the showerhead screws onto. Apply several layers of Teflon tape to ensure a tight seal.
8. Reattach the showerhead: Carefully screw the showerhead back onto the shower arm by turning it clockwise. Use an adjustable wrench or pliers to tighten it, being careful not to overtighten and damage the showerhead or the shower arm. Use the rag or towel to protect the showerhead finish while tightening.
9. Turn on the water supply and check for leaks: Once the showerhead is securely reattached, turn on the water supply by turning the water shut-off valve counterclockwise. Slowly open the valve to allow water to flow into the showerhead. Check for any leaks around the showerhead and make sure that the water is flowing properly from the spray holes. If you notice any leaks, use pliers or an adjustable wrench to tighten the connections further, or check for any damaged components that may need replacement.
10. Test the showerhead: Turn on the shower and test the water flow and pressure. Make sure the showerhead is functioning correctly without any leaks. Adjust the spray settings, if applicable, to your desired preference.
11. Clean up and finish: Once you have confirmed that the leaky showerhead is fixed, clean up any leftover debris or water around the shower area. Remove the rag or towel that was protecting the showerhead finish, and wipe down the showerhead to remove any residue or fingerprints. Double-check that the water supply is fully turned on and functioning properly.
12. Consider replacing the showerhead: If you have tried all the above steps and your showerhead is still leaking, it may be time to consider replacing it. Over time, showerheads can wear out, and even with repairs, they may not function optimally. If you have an older showerhead or one that has been repaired multiple times, it may be more cost-effective and efficient to replace it with a new one. Make sure to choose a showerhead that matches the specifications and fittings of your current shower arm to ensure a proper fit.
13. Regular maintenance: To prevent future leaks and prolong the lifespan of your showerhead, it's essential to perform regular maintenance. This includes cleaning the showerhead regularly to remove mineral deposits and debris that can cause clogs or leaks. You can use a solution of equal parts water and vinegar to soak the showerhead and then scrub it with a soft brush or toothbrush. Additionally, checking for any signs of damage or wear and tear, such as cracks or leaks, and addressing them promptly can prevent further issues in the future.
14. Seek professional help if needed: If you are not comfortable or confident in fixing a leaky showerhead on your own, or if you encounter any complex issues during the repair process, it's best to seek professional help from a licensed plumber. They have the expertise and tools to diagnose and fix plumbing issues accurately and safely.
In conclusion, fixing a leaky showerhead involves several steps, including gathering the necessary tools, turning off the water supply, protecting the showerhead finish, inspecting for damage, cleaning the showerhead, applying Teflon tape, reattaching the showerhead, testing for leaks, and considering replacement if necessary. Regular maintenance and prompt addressing of any issues can help prevent future leaks and extend the lifespan of your showerhead. If you are unsure or encounter complex issues, it's best to seek professional help. With the right tools, materials, and steps, you can successfully fix a leaky showerhead and enjoy a leak-free and efficient shower experience.
If you'd like a professional install, contact the service technicians here at All Trades. We service Las Vegas, Henderson, Boulder City, and most parts of Clark County Nevada. If offer same-day service in most cases.